 RU
RU  EN
EN This section contains settings that affect the appearance and functionality of notes.
Let's look at these settings in order, from top to bottom, as they are located in this section.
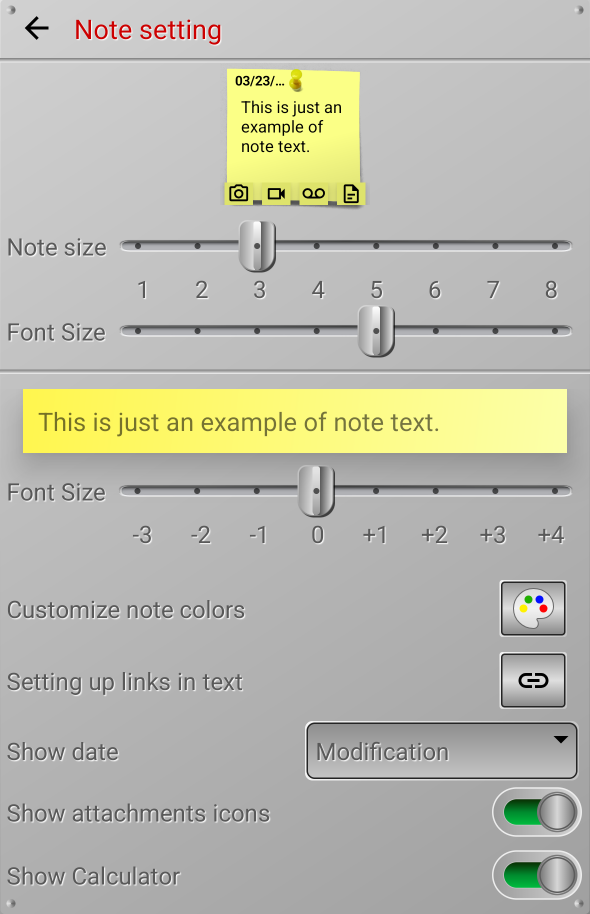
At the top of the settings window, there is an image of a test note. This example shows how the note will look on the board when you change a setting.
Next comes the size adjustment.
Note size
This setting changes the size of all notes on all boards. The larger the note size, the fewer note columns will fit on the board. Select the note size so that it looks as comfortable as possible on your phone screen.
Font Size (First)
This setting sets the size of the text that will appear in the note on the board.
Font Size (Second)
This setting sets the text size that will be used when opening the note for editing. To evaluate the effect of this setting, a sample note text is shown above it, showing how it will appear when editing.
Note:
Font sizes are relative. The actual size will depend on the font used on your phone. If you use different font sizes in a note, its increase or decrease will be calculated relative to the font sizes set in this section.
Customizing Note Colors
To customize note colors, click the button with the palette icon. You'll see the following window:

Note:
This setting doesn't allow you to remove or add new colors; you can only change any of the 10 colors as desired.
At the top of the window is a set of 10 sample notes, each colored in one of the preset colors. You can scroll this set left and right. To change one of the colors, click on the note sample of the desired color. A red border should appear around this note.
Adjust the color you want by moving the sliders "Color", "Saturation" and "Brightness".
You can also select a text color for each note color. This will also be visible on the note sample of the corresponding color.
👉 To save your customized note colors, click the green checkmark.
👉 If you don't want to save your changes, click the red cross.
👉 If you want to restore the note colors to the ones you had when you installed the app, click the corresponding button in the bottom center of the window.
Setting up links in text
Some objects in note text can be automatically converted into links. These objects include web links, email addresses, and phone numbers.
👉 When you click on an internet link, that link will open in the browser installed on your phone.
👉 When you click on an email address, a new email is created to that address. If you have multiple email apps installed on your phone, you will be prompted to choose.
👉 When you tap a phone number, you can quickly call that number. The calling application will open with the number already dialed. If you have multiple apps on your phone that can make calls to phone numbers, you will be prompted to choose.
The link settings look like this:

By default, only Internet links are always converted into links. To make email addresses and phone numbers also become links in the note text, enable the corresponding switches.
By default, to open a link in a note, you need to press and hold it briefly, and then release. A pop-up menu will appear, the first item of which will open the link. However, if you want the link to open immediately, with a single click, enable the switch at the bottom of this window.
Show Date
You can display one of three dates in the upper right corner of a note on the board:
Created – the date the note was first created.
Modified – the date the note was last modified.
Calendar – will only be displayed if the note is linked to a Calendar date.
Note:
Please note that if the date falls on the current day, the time is displayed, not the date.
Show attachment icons
If this option is enabled, attachment icons will appear at the bottom of notes on the board that have attachments. Historically, icons only appear for photo, video, audio, and document attachments.
Show Calculator
Some people keep various calculations and numerical values in notes. In this case, you might occasionally need a calculator when working with a note. To avoid launching a separate application, you can enable this option, and the Calculator can be opened directly in the note.